Showing posts with label formal. Show all posts

Thursday, October 20

A fun Formal Style...

So first of all, I would like to apologize for not posting lately. My class is getting nice and busy near the end, so I'm all sorts of busy with that in addition to all of the regular mom duties. The end is in sight though! :) 

My niece had her 17th birthday party this weekend, and I had the chance to do her hair. I've started to get into doing coloring, do any of you readers like to dye your own or others' hair? I'm not professional in the least, but I've had fun learning new tricks. I started off with Savannah going to a light golden brown (she's naturally a dirty blond, but she's been dying it lately...) She wanted a fun touch of color, so I added the teal streak.

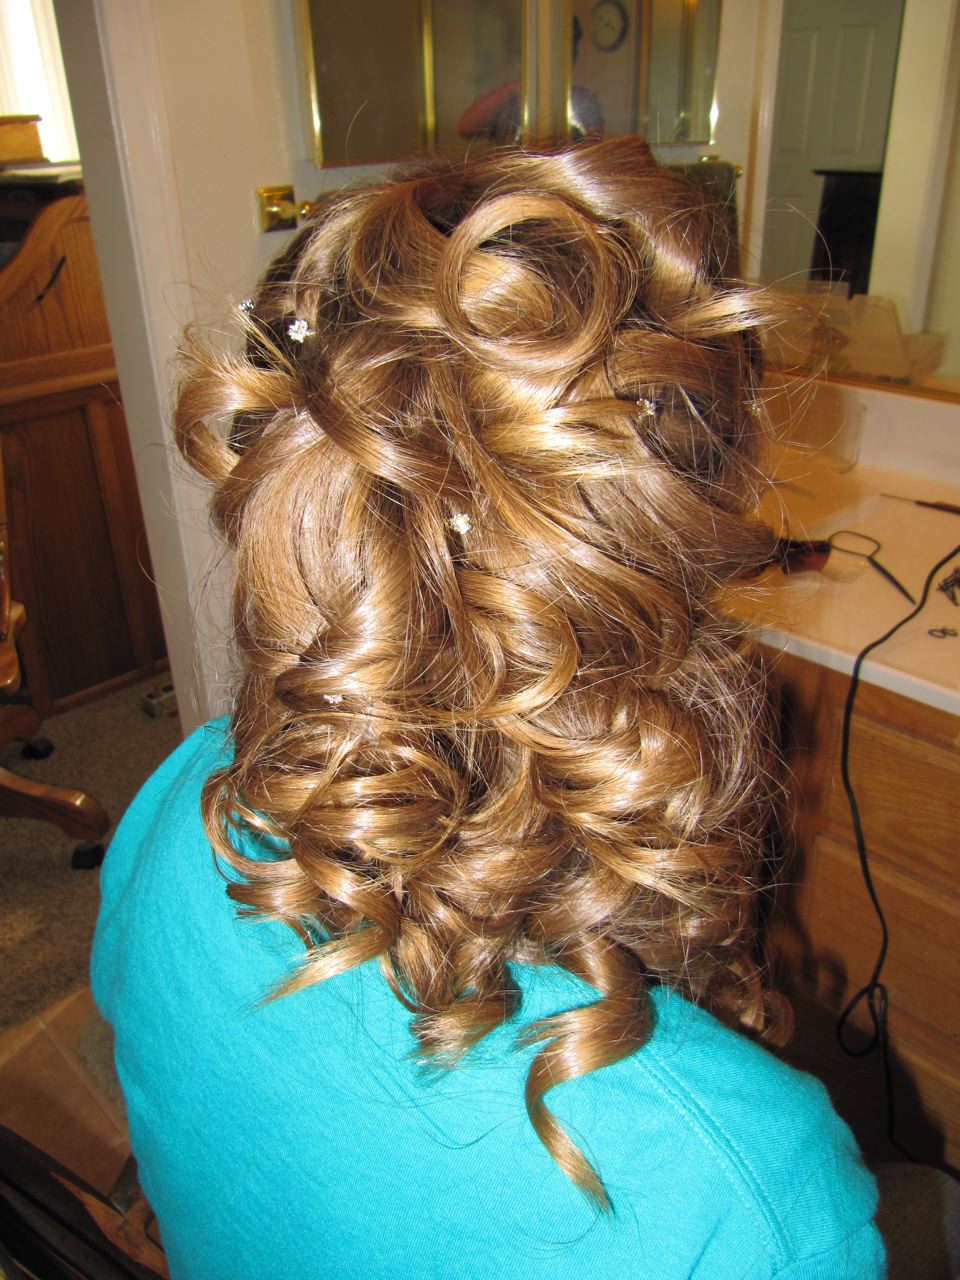
I started by ratting the crown of her head to make the big bump, then wrapped the hair around and used pins to secure.  I did this while the hair was still straight, so I wouldn't have to mess with the texture on the front part of the style. It worked out great, and then I just curled them with my small Frankenstein curler for a wave style- not ringlets. The curls got more and more wavy and loose, and looked great throughout the night.


 I thought I'd be able to hide the pins, but at the end, I needed a fun accessory to cover them. I tried this big bow, but it just didn't look perfect. I had some netting, feathers, and flowers, so I made this quick clip that looked perfect with her dress. (Sparkly pink and zebra print)


Here she is with her makeup and dress on- so beautiful! Happy Birthday, Savannah!

Thursday, July 14

Special Occasion Hair...

In our religion, kids can choose to be baptized when they are 8 years old. It's a big deal for most kids! Emma had her birthday at the end of June, so her baptism is coming right up. We have a lot of out-of-town family that will not be able to come, so we decided to send out an email with some photos of her in her dress for those that can't make it, and the church info for those that will be able to make it.

This was a really fun and simple style- just a ponytail that was tightly curled and pinned into place. You can see from the pictures that I pushed almost all of the hair to the front of her head since it was only for photos.


Another super fun thing was the headband. I made it myself after seeing some around blogland that I loved, and was really proud of how it turned out. I was a little worried that it would be too much with the netting and the feathers, but it worked perfectly. I'm planning a tutorial on those soon, so make sure to check back for updates!


Friday, April 15

My Favorite Fancy (but Fast) Hair...

So, anytime I do this hair on one of the little girls, I always get comments on how long it must have taken, and how cute it is...little do they know, it takes maybe 5-10 minutes and is great for those days when you need something cute, but fast.

Hope you like it!


Monday, March 28

Formals!

Our church here in Las Vegas sponsored "The Event" this weekend. It's similar to a prom, but with higher standards. :) I had a couple of super cute girls come over to have me fix their hair. They had just turned 16 (the age you can go) so they were super excited. Nothing too crazy, but both turned out super cute.

E. wanted something big and curly, but loose and fun. She had sent me a few examples of updos that were lower on the head. After curling all of the hair with the flat iron, I ponytailed the back section, twisted back the front pieces, and then bobby pinned all of the hair around into the big "poof." Lots of hairspray and she was finished.


  (See that #1042 next to Michael's Disco Bear? I ran a 1/2 Marathon 2 weeks ago. Yay!)


M. wanted a half, and wanted her bangs pulled back. I started by curling all of her hair as well. I did a small ponytail at the top of the head (to anchor all of the other sections I'd pull back) and then just twisted and pinned as I went along. I also added the detailed twist in the front to hold her bangs back, and then just pinned the longer strands into a small poof. Super simple, but oh so cute.


Tuesday, January 18

Deja Vu?

I was attempting a different hairstyle (I'll retry it later so I don't want to give it away,) but failed at the one I was trying to duplicate, but came up with this one instead.  I'm a little worried that I may have seen one like this before, but I have gone through a couple blogs, and can't find anything, so hopefully I'm not stealing anyones idea! (If you know of one like this, will you leave a comment with the link?)

The video shows the steps, but I did go back at the end and cut out the first rubberband so the hair was a little more loose, and the hair was actually holding the ponytail.


Sunday, January 9

Fancy Maia...

Maia loves Fancy Nancy lately. She's been a bit impatient about fixing hair lately, which leaves me to ponytails most of the time, but today I asked if I could make her Fancy like Nancy. Of course she let me. :)

I started out with an anchor ponytail, then sectioned her hair and pulled it into that ponytail.


Maia's hair is super thin and fine- definitely different than Emma and Ruby's. For her I have to use gel or everything would fall out. One of my little tricks with gel is that I just squirt a blob into the sink and smudge my fingers in it when I need it. Much easier than trying to squeeze a tiny bit onto my fingers and hold the hair at the same time.


 I just did twists in the front, but knew that twists would fall out pretty easily in the back, so I did simple braids back there.
 When I'm curling the hair in a little bun like this, I always try to curl it in the direction that I want it to go. (So curl this section forward since it's supposed to stay forward, the sides I do sideways, etc.)


The only curl I secured was the back one with a tiny clip under the curl, only because I didn't want the braids to be covered.

If you enlarge this one you can see the front and back pretty well. I've said it before, but playing in the sink is one of my other tricks to getting little girls to sit still for a bit. Maia's all about washing hands, so it's a good distraction.

Long Time, No Blog!

It's been a while! Between getting the kids back in school, and starting two courses myself, it's been a hectic week! (Which usually means lots of ponytails or basic braids!)

Our church moved times to 11 now, so we've got some good hair fixing time in the mornings that we didn't have last year. Here are a couple that are a little more fancy that I did of the girls this morning. (I'll do two different posts so they aren't too huge...)

I usually start these with a little circle of hair pulled into a ponytail. It's a great anchor for updos. You can add braids, twists, pretty much anything.


 Once you have that, just start sectioning and twisting the hair back. For the little girls I just use an additional rubberband for each twist. I will use bobby pins, but they don't look as nice for the little girls, and they don't hold their hair as well during crazy-acrobatics-before-church-time. (Never fails when I do a fancier do, they feel the need to wrestle or do a summersault.) :)


See how there's a good 5-6 rubberbands here? I sometimes try to take out the lower layer bands, but it hurts a bit, so I left it alone. :)
 Now with the ponytail, you can either curl it and leave it down, or you can pin it up. I like to pin it, so the twists are really visible. Not so fun to do all that work and not have it show...

When I pin it up, I will either do a fancier ballerina bun style, or I will just do a little messier- I will take a small section, twist it a few times, then grab it in the center, and twist it back on itself a bit. It makes sort of a figure-8 like this, then I just pin it in the intersection of the hair...


Wednesday, May 19

A few Fancy dos...

I got a call yesterday afternoon to ask if I would fix hair for a few girls in our church. They were making "prom time capsules" where they were going to try on dresses and take pictures for when the actually do go to prom in a few years. I thought it was a fun idea, and of course I jumped at the chance to do fancy dos. :)

So, here they are. No step by step photos, but maybe it will give you an idea for a starting point.

This one just wanted something up with pincurls. In my head, pincurls are nice and flat to the head, so I mixed them with just a few regular pinned curls. :)

M. just wanted something up and curly- nothing too specific, so I did twists going back into nice poofy buns.

E. was cute- she said she never really curls her hair because it takes so long (She's got a ton of thick hair- so pretty!) So I thought it would be nice for her to have it mostly down and curly. 


Sunday, April 18

Prom Hair...

I know this one isn't going to be very useful for all of you with little girls, but I thought I'd post it anyway. Kim is my neighbor, I've known her for a good 10 years or so now, so her going to prom makes me feel nice and old.

Kim requested curly and pulled to one side, so here's what I did. Start with curing the entire head with the flat iron. I pulled it to the side in sections, using about 3 bobby pins per section to secure it. I pinned the curls into place using the cute little diamond bobby pins. Cute! :)


Related Posts Plugin for WordPress, Blogger...