


So, here's the process- start out by finding a good entertainment center. I had to find one that was big enough for Emma, but not too huge. I still had trouble finding a place to put this in our house where it wasn't in the way. I really lucked out as I had just told my husband about my idea and he emailed me that same day saying that a co-worker had a nice oak one she didn't want anymore. It was destined to be my little kitchen. :)
Start by removing all hardware and priming the piece.


This is the primer I used, and I was really impressed with it- super easy to clean up, and really nice coverage.

Paint the main color of the kitchen- you cant really see here, but the sides and top are all this blue color, as well as the insides of the cabinets.

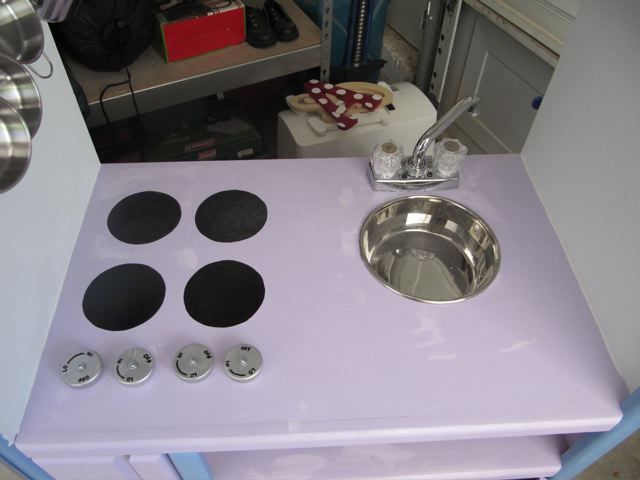
Here shows the counter tops and cupboard doors painted purple.

It comes in handy when you're using powertools for the first time to have someone there as backup that can handle the need-to-be-exact-or-the-project-is-ruined cuts. Here my Dad helped me do the circle for the sink. (It's actually an old stainless steel dog bowl that we had around)

Next we cut some pieces of 1/4" MDF for the fridge and oven doors. I wanted them to be lightweight but still a little tough, and this is what I had in my garage. I purchased the handles and the oven knobs (closet rod hangers) at the Habitat for Humanity Restore here in Las Vegas, which is a really fun store for building materials.

I was searching for a faucet, but didn't want to spend a ton of money on one, and eventually I gave in and bought this one. It was labeled as a "Laundry Room Faucet" at Lowes, and was about $17 or so- the most expensive purchase for the project. I tried to epoxy this as well, but it was kind of loose, so I got a little tough with it by adding a couple grabber screws in the front.


I debated on the color of the fridge and oven for a while, and eventually decided on spray painting them silver to look like stainless steel. I already had these attached (not thinking ahead as usual) so I put a sheet behind the doors, but over the rest of the project before I painted. I still got some on the blue around the hinges, but that was easy to retouch.

I found this acrylic sheeting at Lowes, and thought it was perfect for the oven door. It has that film that comes off, and it's nice and clear. I just used an epoxy to glue this into place, as I didn't want too many screws for little body parts to scratch on.

I used a high-gloss black paint for the burners. (and inside the oven as well.) This was another thing I searched for something circle that would look nice as a burner, but then I just decided that I would paint them on. I think it looks good, and if they ever get scratched up, I can just retouch them without having to replace anything.

Make sure to watch your paint bucket carefully. Little babies are sneaky.

The fridge and oven didn't stay closed completely, so I added these little magnetic closures.

Painted on the controls for the stove

Retouch any scuffed or scratched parts
Professionally hang some frames for your little one to draw some photos for (I say professionally because it took me 3 tries to get them in the right spot. Luckily the other nail holes are behind the frames.) :)

Surprise your little birthday girl with the project in the garage that she couldn't see for 4 days, and you've got one happy little bug. Emma's wanted a kitchen for a long time, but I didn't want to buy a cheap plastic one again. (We've already had 2 in her lifetime that somehow got broken) This was the perfect alternative. Reusing something old, and making something that will actually last for a long time.

I found all of the dishes and other accessories at Walmart. I eventually want to make a bunch of felt foods, but that project will have to wait for a few weeks. I'm a little tired. :)


Very cute! I love when things get a new life. I wish it were mine:)
ReplyDeleteThat is amazing! Beautiful work.
ReplyDeleteYou are such a cool Mom! I LOVE it!
ReplyDeleteThat's awesome!!! Even my dh thought it was cool :)
ReplyDeleteI love this idea! Smart way to reduce, reuse and recycle! :)
ReplyDeleteLove this and I would love if you would post it to my Upcycled Awesome Linky party!
ReplyDeletehttp://www.thetshirtdiaries.com/2010/07/upcycled-awesome-4_07.html
This is such a sweet project!!!! You did a great job.
ReplyDeleteYour children are adorable, too.
I am so in love with this project! I featured it on my linky party roundup here: http://www.thetshirtdiaries.com/2010/07/upcycled-awesome-4-hotlist.html
ReplyDeleteThis comment has been removed by a blog administrator.
ReplyDelete